Installation
Command-line install, FTP/shared-hosting install, and the browser installer flow with generated mockups.
This guide covers the three supported install paths for Andrea Helpdesk:
- command-line install on a VPS or dedicated server
- FTP / SFTP upload for shared hosting
- browser-based setup through
/install/
If you just want the fastest path:
- use Command Line Install if you have shell access and can point the site document root at
public_html/ - use FTP + Web Installer if you are on shared hosting or cannot point the document root at
public_html/
Fastest VPS Path
If you want to watch the CLI install flow first:
Step 1: Create the database
mysql \
  -u db_admin_uuser \
  -p \
  -e "
    CREATE DATABASE \`andrea-helpdesk\`;
    GRANT ALL PRIVILEGES
      ON \`andrea-helpdesk\`.*
      TO 'andrea-helpdesk-user'@'localhost'
      IDENTIFIED BY 'andrea-helpdesk-pass';
    FLUSH PRIVILEGES;
  "
Do not use the example database names, usernames, or passwords shown above. Replace all of them with your own values.
Step 2: Run the installer
wget -qO - https://www.andreahelpdesk.com/installer/ | bashThe CLI installer is interactive. It reads answers from your terminal even when the script itself is piped into bash.
If you prefer to download it first:
wget https://www.andreahelpdesk.com/installer/install-cli.sh
bash install-cli.sh
If you want to read the installer before running it, open:
https://www.andreahelpdesk.com/installer/What the CLI installer does:
- prints the installer source and asks for confirmation before doing any work
- asks whether this is a local install or a remote SSH-driven install
- checks prerequisites such as:
gitphpcomposermake- required PHP extensions
- asks for the repository URL and ref to install
- asks for the site document root and stops if it cannot be
public_html/ - if the chosen install directory already exists and is not empty, warns clearly and asks twice before clearing it
- asks for application, database, storage, and admin details
- validates database access before writing
.env - writes
.env - installs dependencies, runs migrations, seeds the initial admin, fetches frontend assets, and installs the cron job
- performs final verification of the install and prints next steps
Requirements
Minimum server requirements:
- PHP 8.1 or newer
- MySQL 8.0 or newer
- Apache with
mod_rewriteenabled, or equivalent web-server routing - PHP extensions:
pdo_mysqlmbstringopenssl
- Recommended / optional:
imapfor inbound email pollingcurlorallow_url_fopenfor installer asset downloads and update checks- cron access for IMAP polling and SLA checks
Directory layout requirements:
public_html/must be the web document rootSTORAGE_PATHmust be an absolute path outsidepublic_html/- the app must be able to write:
.env- the storage directory
storage/logsstorage/attachments
Install Paths
1. Command Line Install
Use this when:
- you have shell access
- you can run Composer
- your web server can point the site document root at
public_html/
Before you run the installer, create a database and database user for Andrea Helpdesk.
Example:
mysql \
  -u db_admin_uuser \
  -p \
  -e "
    CREATE DATABASE \`andrea-helpdesk\`;
    GRANT ALL PRIVILEGES
      ON \`andrea-helpdesk\`.*
      TO 'andrea-helpdesk-user'@'localhost'
      IDENTIFIED BY 'andrea-helpdesk-pass';
    FLUSH PRIVILEGES;
  "
Do not use the example database names, usernames, or passwords shown above. Replace all of them with your own values.
If you want the guided Bash installer, use:
wget -qO - https://www.andreahelpdesk.com/installer/ | bashIf you prefer downloading the script first:
wget https://www.andreahelpdesk.com/installer/install-cli.sh
bash install-cli.sh
If you want to inspect the installer source in a browser first:
https://www.andreahelpdesk.com/installer/The installer will stop if the document root cannot point to public_html/. In that situation, use the FTP / SFTP flow instead.
What The CLI Installer Supports
The Bash installer supports two modes.
Local Mode
Use local mode when the application will run on the same machine where you launch the installer.
In local mode, the installer:
- clones the repository locally
- writes
.envlocally - runs Composer locally
- runs
make db-migrate - runs
make db-seed - runs
make fetch-assets - runs
make cron-install-local - verifies the local install and probes
APP_URL
Remote Mode
Use remote mode when you want to deploy to another server over SSH.
In remote mode, the installer:
- checks SSH access first
- collects
REMOTE_USER,PROD_HOST, andREMOTE_PATH - generates
Makefile.local - clones the repository locally into a working directory
- writes
.envlocally and copies it to the remote host - deploys the code with
make deploy - runs remote
make db-migrate - runs remote
make db-seed - runs
make cron-install-production - verifies the remote application layout, database state, and
APP_URL
Remote mode currently expects SSH key-based or agent-backed access.
What The CLI Installer Checks Before Installing
Before it writes configuration or runs setup commands, the CLI installer checks:
- required commands
- PHP version
- required PHP extensions
- write access to the local working path
- SSH access in remote mode
- document root layout
- database connectivity
- storage-path validity
It also explicitly stops if:
- the install directory is not empty and you choose not to let the installer clear it
- the document root does not point to
public_html/ - the database cannot be reached
- the storage path is inside the document root
CLI Install Walkthrough
The interactive CLI flow is:
- confirm the installer should continue
- choose
localorremote - enter repository URL and ref
- enter install path or remote path details
- enter the document root
- enter
APP_URL, timezone, and JWT secret - enter database settings
- enter
STORAGE_PATH - enter the initial admin account details
- let the installer validate and execute the setup steps
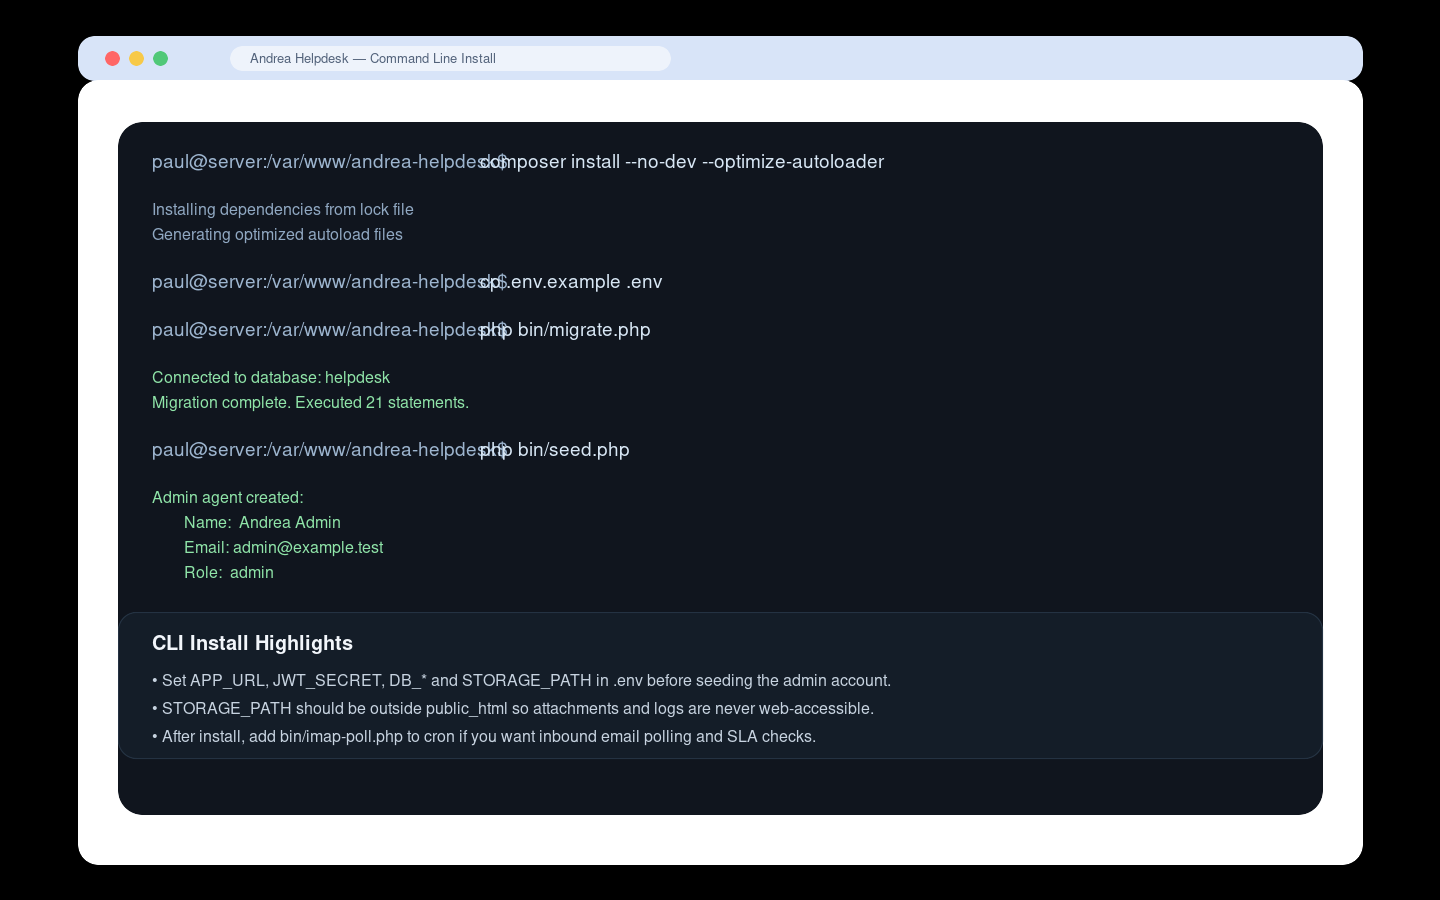
Manual Command-Line Install
If you do not want the guided Bash installer, you can still install manually.
Step 1: Place the application on the server
Example target path:
/var/www/andrea-helpdeskIf you are using Git:
git clone <your-repo-or-release-source> /var/www/andrea-helpdesk
cd /var/www/andrea-helpdesk
If you are uploading a release archive manually, extract it there and cd into the project root.
Step 2: Install PHP dependencies
composer install --no-dev --optimize-autoloaderStep 3: Create .env
cp .env.example .envEdit .env and set at least:
APP_URLAPP_TIMEZONEJWT_SECRETDB_HOSTDB_PORTDB_DATABASEDB_USERNAMEDB_PASSWORDSTORAGE_PATHADMIN_NAMEADMIN_EMAILADMIN_PASSWORD
Important notes:
JWT_SECRETshould be a long random value, at least 32 charactersSTORAGE_PATHmust be outsidepublic_html/ADMIN_PASSWORDis used byphp bin/seed.php; clear or rotate it afterward if that matters to your process
Step 4: Create the storage directories
Example:
mkdir -p /var/www/andrea-helpdesk-storage/attachments
mkdir -p /var/www/andrea-helpdesk-storage/logs
touch /var/www/andrea-helpdesk-storage/logs/app.log
touch /var/www/andrea-helpdesk-storage/logs/imap.log
Step 5: Run database setup
php bin/migrate.php
php bin/seed.php
php bin/migrate.php creates or updates the schema.
php bin/seed.php creates the initial admin agent using the ADMIN_* values from .env.
Step 6: Fetch frontend assets
make fetch-assetsThis downloads the self-hosted frontend assets used by the app:
- Bootstrap
- Bootstrap Icons
- jQuery
- DOMPurify
- Quill
Step 7: Point the web root to public_html/
Your vhost or site config should serve:
/var/www/andrea-helpdesk/public_htmlnot the project root.
If your environment cannot point the document root there, stop and use the FTP / SFTP workflow instead:
https://docs.andreahelpdesk.com/install/#2-ftp--sftp-installStep 8: Log in
Open:
https://your-domain.example/and sign in with the admin email and password you set in .env.
Step 9: Add cron for IMAP polling and SLA checks
Recommended cron:
* * * * * php /var/www/andrea-helpdesk/bin/imap-poll.php >> /var/www/andrea-helpdesk-storage/logs/imap.log 2>&1This handles:
- inbound email polling
- SLA escalation checks
- log trimming
What The CLI Installer Verifies At The End
After the install steps finish, the CLI installer performs a final verification pass. It checks:
.envexists- Composer dependencies exist
- frontend assets exist
- storage directories and log files exist
- the database schema exists
- the admin agent record exists
APP_URLresponds over HTTP
If the HTTP check fails but the filesystem and database checks pass, the installer reports that the application is probably installed correctly but the web server or document-root configuration still needs attention.
2. FTP / SFTP Install
Use this when you do not have Composer or shell access on the hosting account.
Step 1: Prepare the upload locally
Preferred option:
That package already includes production Composer dependencies and bundled frontend assets, so you can upload it directly by FTP / SFTP and continue with the browser installer.
If you are uploading from your own local checkout instead of a packaged release:
From your local checkout:
composer install --no-dev --optimize-autoloaderThat ensures the vendor/ directory is available before upload.
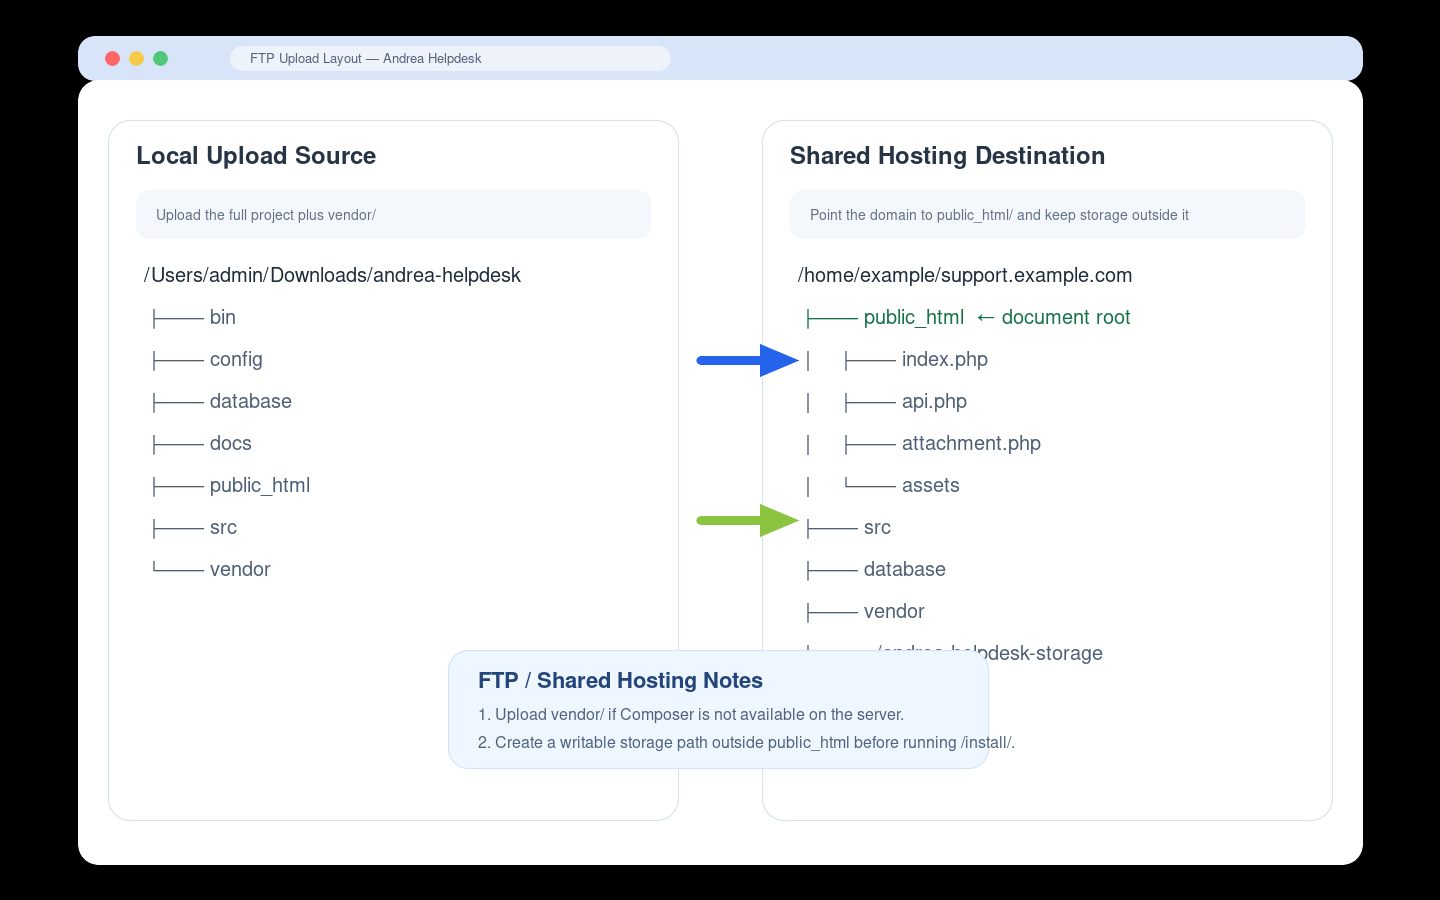
Step 2: Upload the project files
Upload the full project to your hosting account, including:
public_html/src/config/database/bin/vendor/
The domain or subdomain should point at the uploaded public_html/ directory.
Example layout:
/home/example/support.example.com/
├── bin
├── config
├── database
├── public_html   ← document root
├── src
├── vendor
└── ../andrea-helpdesk-storage
Step 3: Create a storage directory outside the web root
Create a writable folder outside public_html/, for example:
/home/example/andrea-helpdesk-storageIt should contain or allow creation of:
attachments/logs/
If your host does not let PHP create folders automatically, create them manually.
Step 4: Run the browser installer
Open:
https://your-domain.example/install/Then complete the installer steps:
- requirements check
- database connection
- application settings and admin account
- install confirmation
- completion log
The installer writes:
.env- database schema
- admin agent account
install.lock
If the host blocks Composer or asset downloads, the installer will complete with warnings rather than failing hard. That is expected on some shared-hosting systems when you already uploaded vendor/.
Step 5: Restrict or remove the installer
After the install finishes:
- delete
public_html/install/, or - restrict it so it cannot be accessed publicly
The lock file prevents re-running, but removing or restricting the installer is still the right operational step.
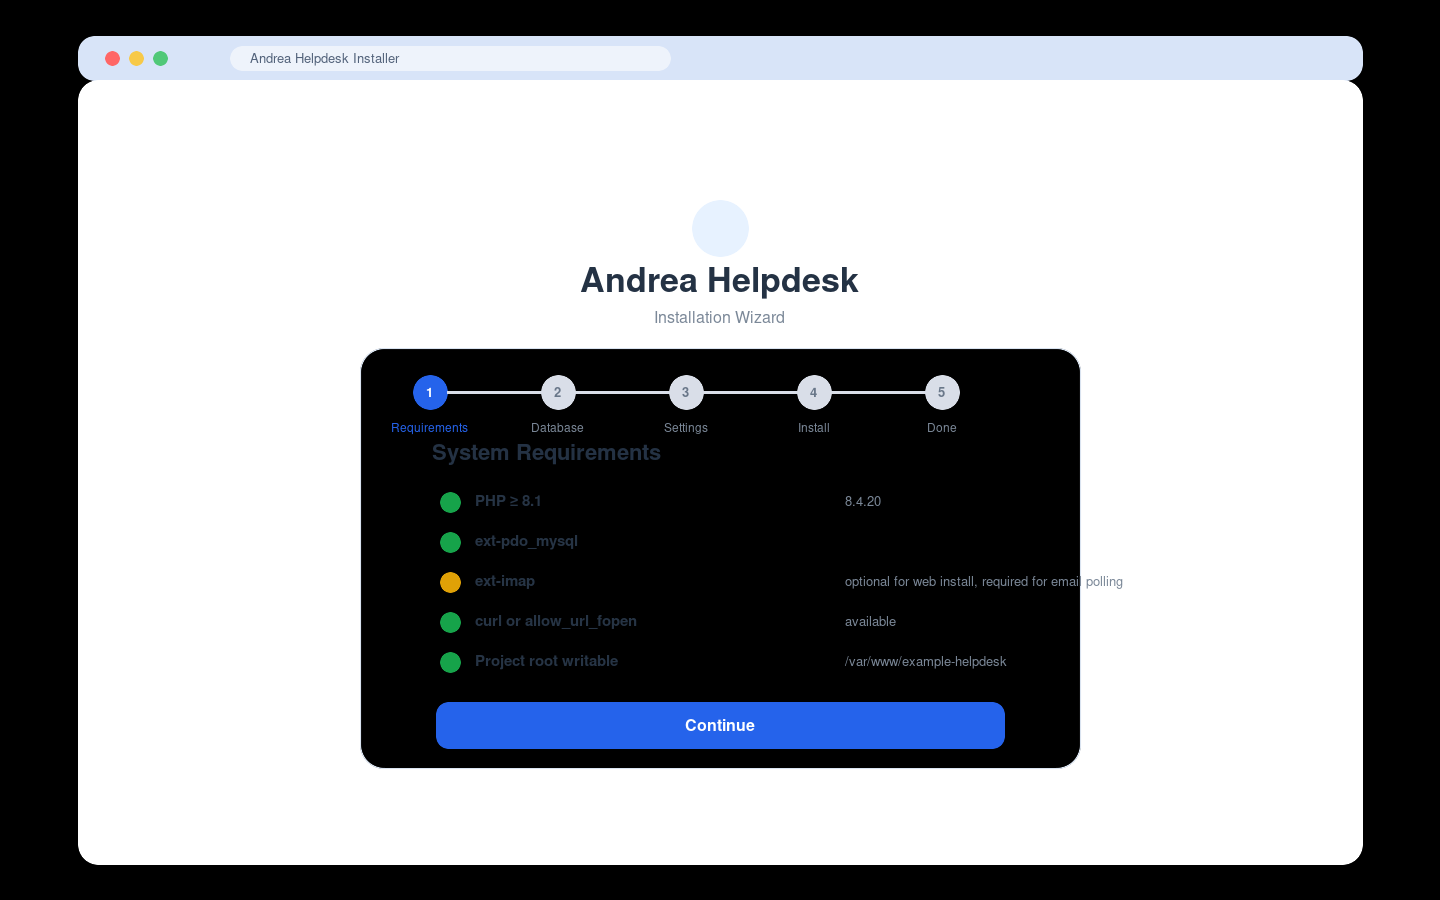
3. Browser Installer Walkthrough
This section documents the /install/ wizard itself.
Step 1: Requirements
The installer checks:
- PHP version
- required extensions
- download capability (
curlorallow_url_fopen) - schema file presence
- project-root writability
- vendor parent-directory writability
- whether
exec()is available for Composer
Notes:
ext-imapis shown as optional in the installer so the app can still be installed without email polling on day oneexec()is also treated as optional because many shared hosts disable it
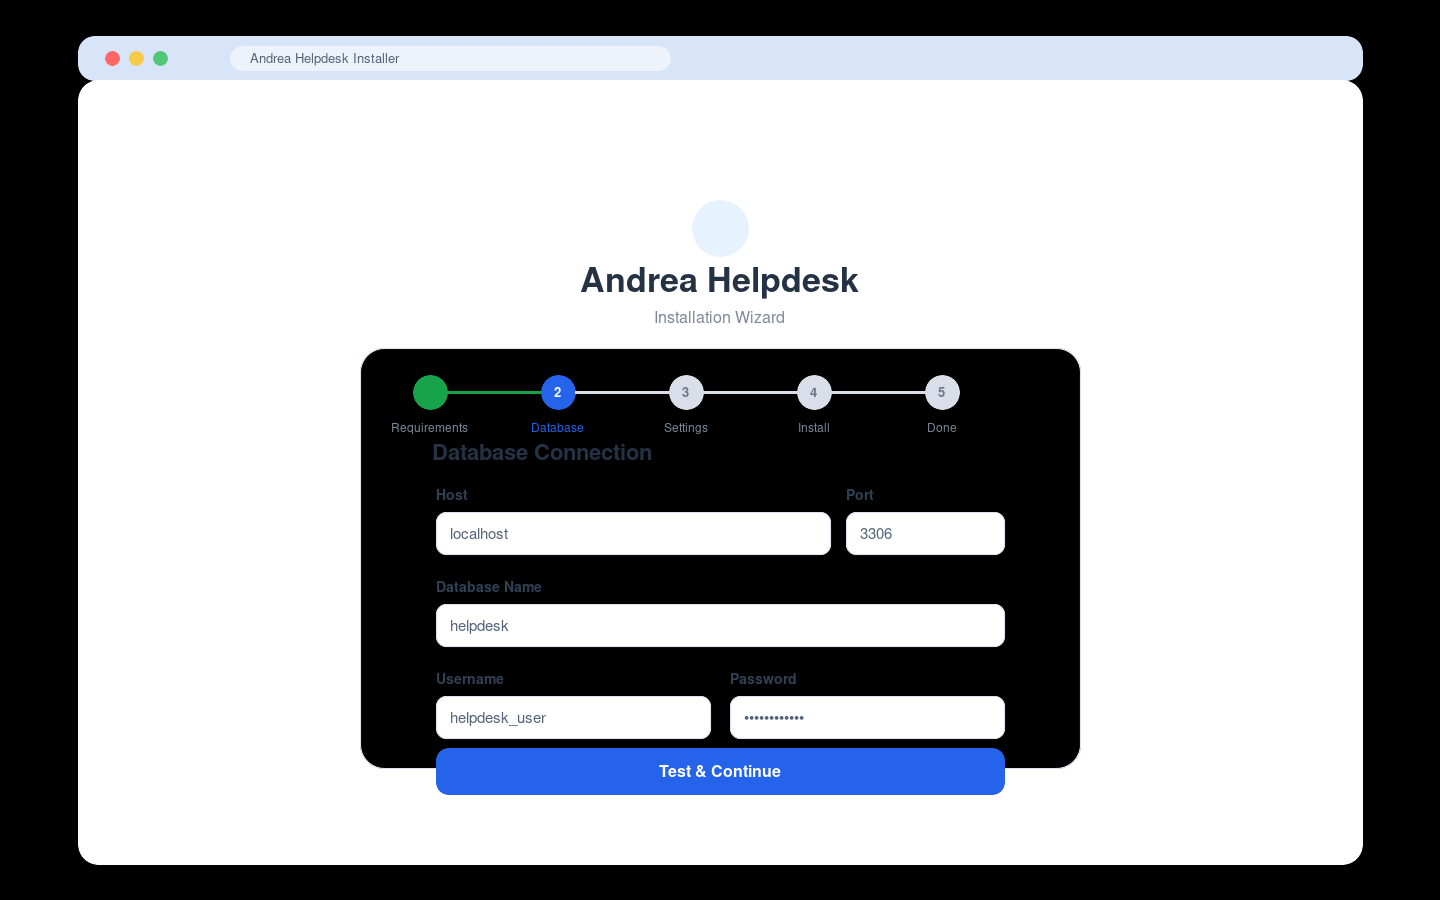
Step 2: Database Connection
Fields:
HostPortDatabase NameUsernamePassword
The installer tests the connection before allowing you to continue.
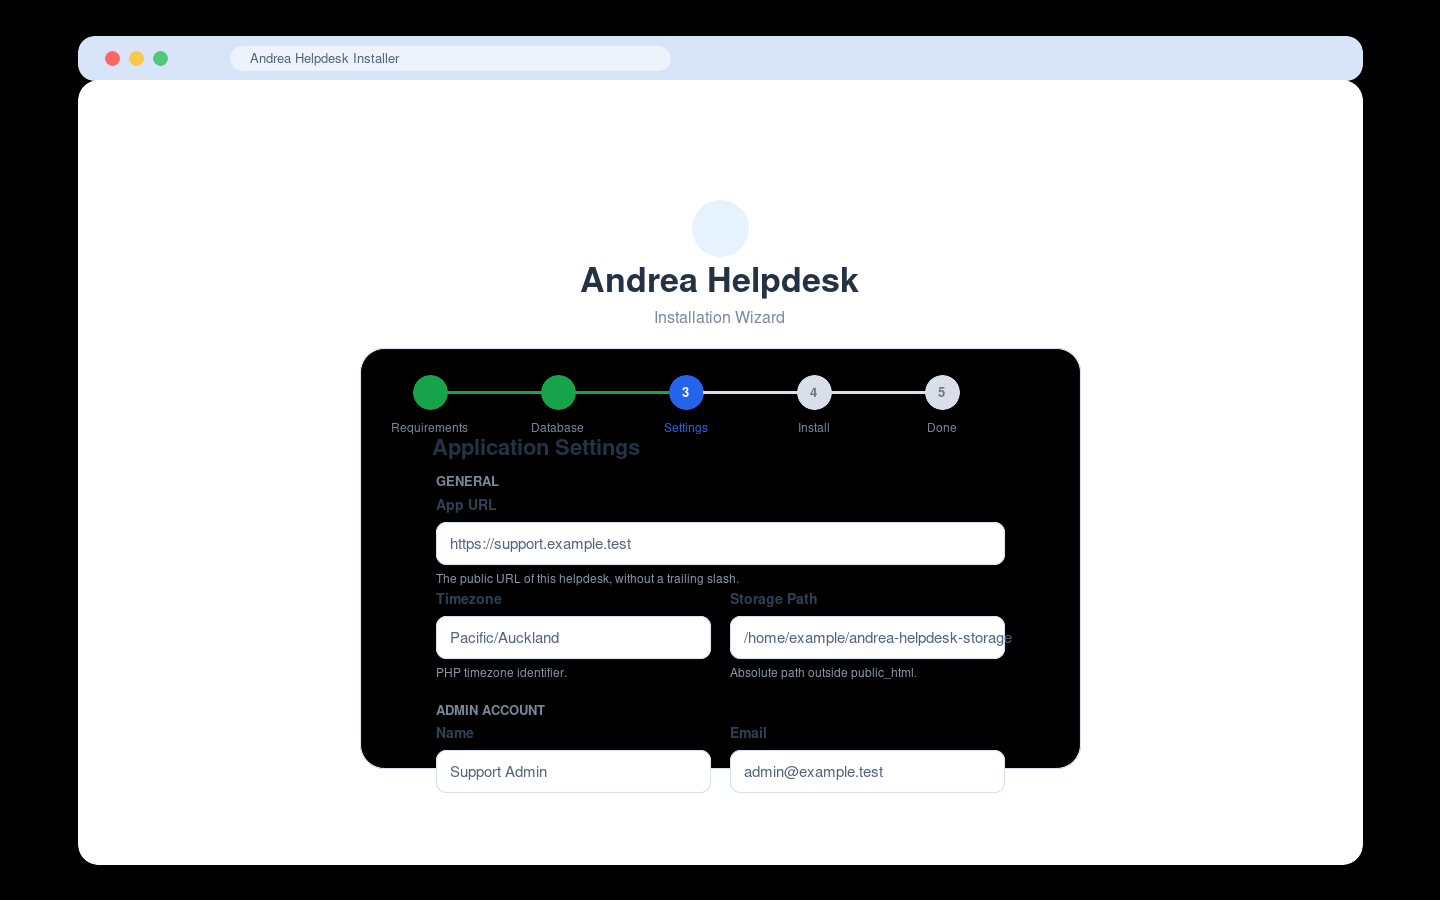
Step 3: Application Settings
General fields:
App URLTimezoneStorage Path
Admin account fields:
NameEmailPasswordConfirm Password
Storage Path must be an absolute server path outside public_html/.
Step 4: Ready To Install
The installer shows a summary of:
- app URL
- timezone
- storage path
- database target
- admin email
Click Run Installation to execute the install.
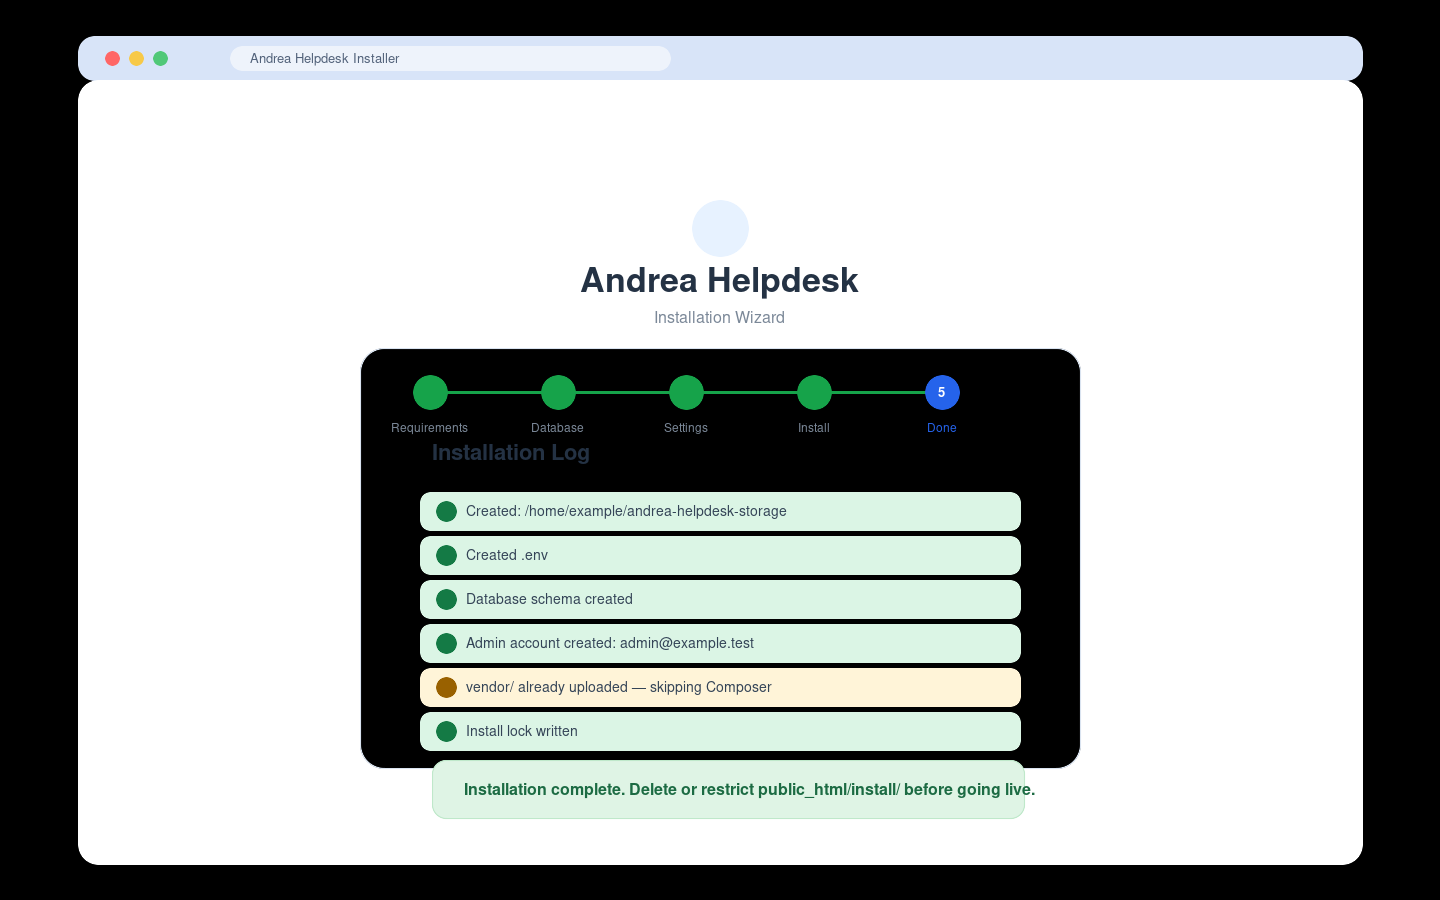
Step 5: Installation Log
The installer logs each step, including:
- directory creation
.envcreation- schema creation
- admin creation
- frontend asset download
- Composer status
- lock file creation
If there are warnings but no errors, the install is usable, but you should still address those warnings before going live.
Install Screenshots
These are mock screenshots based on the real installer flow. They are intentionally illustrative rather than literal captures.
CLI Install
FTP / Shared Hosting Layout
Web Installer — Requirements
Web Installer — Database
Web Installer — Settings
Web Installer — Complete
Shared Hosting Notes
Some shared-hosting environments behave differently from VPS installs:
exec()may be disabled- Composer may not be available
- PHP may not be able to overwrite account-owned files during in-app updates
- cron may need to be configured from the hosting control panel instead of shell
That usually means:
- upload
vendor/yourself - use
/install/for setup - use manual FTP/SFTP deployment for upgrades if the in-app updater preflight reports overwrite or permission failures
Do not solve updater problems by making the app tree world-writable.
Post-Install Checklist
After any install method:
- Log in as the admin user.
- Set branding, SMTP, and IMAP settings.
- Confirm
APP_URLis correct in Admin → Settings → General. - Configure cron for
bin/imap-poll.php. - Send a test SMTP message.
- Add an IMAP account and run Poll Now.
- Remove or restrict
public_html/install/.
